Have you ever considered how individuals share their Instagram posts on Facebook? The trick is to cross-link your accounts so that you can allow Instagram to upload your picture or video to the other tab when you post.
Plus, connecting your accounts will give a message that you are now on Instagram to your Facebook mates. This makes it possible to acquire followers from that network without a “follow-me” message.
Benefits of linking Instagram to Facebook page
Establish the trust of clients
Don’t overlook the significance of providing customers with a secure online experience. The followers will have faith that they are interacting with the same organization by linking their accounts, and you will have smooth interactions.
Plan posts across platforms
If you have a packed schedule or run multiple accounts, you still enjoy the benefits of scheduling posts. To schedule posts for Instagram and Facebook on Hootsuite, you will need to link your accounts to them (or another dashboard for social media management).
React quicker to messages
By linking your Instagram and Facebook accounts, you can manage your messages in one place. This makes it much smoother to achieve a fast response time and helps you to access more tools for inboxes, from customer brands to message filters.
Get deeper perspectives
You may compare crowds, post results, and more, with both platforms related. See where the organic projects are taking root, and determine where investing in promotions makes the most sense.
Conduct strong commercials
In certain areas, to run advertisements, you need to connect to a Facebook profile. Even if it’s unnecessary, connecting accounts lets you run ads and pay for them on all sites in one place.
Steps to link Instagram with the Facebook page:
Following are the steps to link Instagram with Facebook page
Step 1 :
Start with your Instagram profile
Your first move is to pull up and click the profile icon in the lower right corner of your own Instagram account on your phone. Then, in the upper right corner, press the gear button. That will lead you to your choices, where a variety of your settings, including social settings, can be changed.
Step 2:
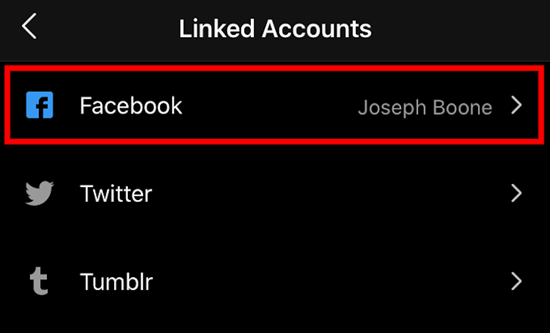
Set up (or update) your linked accounts
You’ll want to scroll down to where “Settings”> “Linked Accounts.” when you get to your options. That’s when you’re going to customize where else you want to show your Instagram images on social media. Tap Linked Accounts, and you will see all of your choices for which Instagram social networks you can connect to.
Step 3:
Connect to Facebook
You would need to go through the permissions to post content there if you are not already linked to a particular network. You’ll need to link to Facebook on your device to make this step work. Once that’s completed, press “Facebook” on your Sharing Settings device. Next, your privacy settings will be demanded. If you’re only going to post your pictures on a business website, you should pick “Friends.” The people that are really going to see your pictures are the ones that want the page you’re going to launch, which we’re going to get to in later phases. You will be led back to your Sharing Options, where you can now choose Facebook before you hit ‘Yes.’ If you don’t, make sure you select it. The logo should appear in blue to signify that your statements on Facebook are already being posted.
Step 4:
Pick where you’re sharing on Facebook.
You’ll want to use your Share Settings after linking Facebook to Instagram to decide where you’ll be posting Instagram posts on Facebook. By default, pictures will be posted to your personal Facebook profile if you have allowed Facebook to only link to Instagram.
Tap’ Share To’ to show all the locations on Facebook where you can post your Instagram images. This implies your timeline or some company sites where you have an administrator position.
Go back to your Sharing Settings after selecting the Facebook profile where you want your pictures to be shared.
Presently, it ought to be determined that your Instagram photos are being presented on your number 1 business profile on Facebook.
Step 5:
Make sure you’re sharing responsibly.
If you’re using Instagram for personal and business accounts, remember that you’ll have to change these settings any time you want to change where your pictures are uploaded.
Suppose you’re very worried about the potential risks of having the same Instagram username with all of them and we’ve all seen how social media multitasking may go wrong. In that case, you will want to set up a unique Instagram handle to your business that is entirely separate from your personal one.
If that’s the case, to connect your Instagram account to Facebook, you would have to follow the same steps. The good news here? Instagram has a convenient feature that allows you to switch back and forth between multiple profiles.
Step 6:
Start sharing!
You’re all related! You can now go back to your home screen and pick which image you want to share.
Only make sure you have Facebook listed as one of the sites where you want your photo to be shared when you’re ready to share your photo.
Link Instagram to different Facebook accounts With Zapier
You can create a personalized integration between Instagram and any Facebook profile that you handle with Zapier. You can use the simple template to get started. If you haven’t already, you will have to sign up for a Zapier account and then log into your Instagram and Facebook accounts. Then you can choose which data in the post should and should not show up. When you’re done, press Proceed, and you can run a test and then turn the automation on. All Instagram messages will be sent to your Facebook page now, and for as many Facebook pages as you want, you can replicate this process.
Conclusion:
Although Facebook has been making attempts for a while to merge the site with Instagram, the distribution of content has always been one-sided. With the introduction of the latest Facebook update, which enables Instagram to upload a photo, advertisers are getting excited about the possibilities.
It is pretty straightforward to use this feature as you can simply pick the option of sharing with Instagram when making a Facebook picture update. However, the feature is restricted in functionality, and some limitations relate to cross-posting from your Facebook profile to Instagram. When you try this feature to upload photos concurrently to Facebook and Instagram, keep these limits in mind.